
- Wall Lights Made Easy: The Exact Guide You're Looking For
- Introduction to Wall Light Installation
- Why Choose Wall Lights?
- Steps to a Successful Installation
- Choosing the Right Wall Light
- Types of Wall Lights
- Suitable Materials and Designs
- Preparing for Wall Light Installation
- Tools and Materials Needed for Installation
- Safety Precautions Before Starting Work
- Step-by-Step Wall Light Installation Guide
- Preparing the Wall and Electrical Wiring
- Mounting the Wall Light
- Connecting and Testing Electrical Circuits
- Troubleshooting Common Installation Issues
- What to Do When the Light Doesn't Work
- How to Fix Incorrect Wiring
- Optimal Placement and Maintenance of Lights
- Tips for Proper Light Placement
- Regular Maintenance and Cleaning
- Frequently Asked Questions About Wall Light Installation
- How Long Does a Typical Installation Take?
- Does Light Installation Need to be Done Professionally?
- Conclusion: Successful Wall Light Installation
- Evaluation of the Process and Results
Introduction to Wall Light Installation
Installing wall lights is an effective way to transform a home space using light. A correctly chosen and installed wall light can not only provide optimal room illumination but also significantly enhance the aesthetic appeal of the interior. However, many DIY enthusiasts hesitate to undertake the installation due to concerns about handling electrical components.
Why Choose Wall Lights?
Wall lights offer a range of benefits that make them indispensable in modern interior design. Primarily, they save floor and table space, which is an ideal solution for smaller rooms. They also provide ambient lighting that creates a pleasant atmosphere without the harsh shadows typical of ceiling lights. Their strategic placement can highlight architectural features or artworks and ensure an even distribution of light in the space.
"A well-chosen wall light is not just a light source, but also a design element that can completely transform the character of a room."
Steps to a Successful Installation
Successful installation of a wall light requires a systematic approach. The process begins with careful selection of a suitable light according to the needs of the space and your preferences. This is followed by preparing tools, disconnecting electricity, and identifying the installation location. Then comes the mounting of the bracket, connecting electrical wires, and the final placement of the light on the wall. The entire process concludes with testing functionality and fine-tuning the position for optimal lighting effect.
Choosing the Right Wall Light
When choosing a wall light, it is necessary to consider several key factors to ensure that the chosen lighting fulfills its purpose both functionally and aesthetically. The selection of the correct light depends primarily on the intended use, the size of the space, and the existing interior design.
Types of Wall Lights
There is a wide range of wall light types on the market, each with unique characteristics and uses. Among the most common are wall lights with direct light, which provide targeted illumination of specific areas, and wall lights with indirect light, which create a softer, diffused illumination suitable for relaxation zones.
An innovative solution in this category is the Liora LED wall light from Sonear Lighting. This modern light combines elegant design with advanced LED technology, ensuring energy efficiency and a long lifespan.
Liora offers variable lighting intensity and the ability to adjust the color temperature of the light, allowing you to adapt the room's ambiance to your current mood or needs. Thanks to its minimalist design, it fits into any interior and represents an ideal solution for those seeking a combination of functionality and aesthetics.
In addition to LED luminaires, traditional incandescent luminaires, which often offer a more classic look, or halogen luminaires providing more intense lighting, are also available. For specific purposes, such as reading or illuminating a work surface, wall luminaires with adjustable arms are suitable.
Suitable materials and designs
The materials of wall luminaires significantly affect their visual impact and functionality. Metal luminaires excel in durability and often provide a modern, industrial look. Glass luminaires, on the other hand, offer elegance and the ability to diffuse light for a softer effect. Fabric shades are ideal for creating a cozy atmosphere and subdued lighting.
The luminaire's design should correspond to the overall style of the interior. Geometric shapes with clean lines are suitable for minimalist spaces, while more ornamental or rustic models are better for more traditional interiors. It is also necessary to consider the proportions of the luminaire in relation to the size of the wall – too small a luminaire may look lost on a large wall, while too large may visually shrink the space.
Preparing for wall luminaire installation
Thorough preparation before starting the installation of a wall luminaire is a key factor for a safe and successful result. This phase includes gathering all necessary tools and materials, as well as implementing essential safety measures to prevent electric shock or other accidents.
Tools and materials needed for installation
For efficient installation of a wall luminaire, you will need a specific set of tools and additional materials. The right equipment minimizes complications and facilitates the entire assembly process.
- Screwdriver (flat and Phillips) - for handling various types of screws and connectors
- Electrical tester - to verify the absence of electrical voltage in circuits
- Drill with bits appropriate for the wall material - for creating mounting holes
- Wall plugs and screws - for securely fastening the luminaire to the wall
- Electrical tape - for insulating connections
- Wire strippers - for preparing conductors for connection
- Spirit level - ensures straight placement of the luminaire
- Measuring tape or ruler - for precise measurement of the installation position
- Pencil - for marking drilling points
- Terminal blocks (if not included with the luminaire) - for safe conductor connection
Depending on the complexity of the installation and the type of wall, other specialized tools may be needed, such as a circuit detector for locating electrical cables in the wall or special drill bits for ceramic tiles.
Safety precautions before starting work
Working with electrical installations requires maximum caution. Adhering to the following safety precautions is an absolute necessity to eliminate risks associated with wall luminaire installation.
The primary step is to turn off the electricity in the circuit where the luminaire will be installed. You do this by disconnecting the appropriate circuit breaker in the distribution box. After turning off the circuit breaker, it is essential to verify the absence of voltage using a tester on the conductors at the installation site. Do not underestimate this step - sometimes circuits can be wired non-intuitively.
Work in a well-lit area, ideally in daylight or with the help of a battery-powered light. Make sure you are standing on a dry, non-conductive surface and using tools with insulated handles. If you are unsure about any aspect of the installation, do not hesitate to consult a specialist or electrician.
| Safety Step | Reason | Note |
|---|---|---|
| Turn off circuit breaker | Prevention of electric shock | Mark the circuit breaker so no one turns it on |
| Verify with tester | Confirm absence of voltage | Check all conductors |
| Use insulated tools | Additional protection against electric current | Even when the circuit is off |
Always remember that no installation is worth the risk of injury. If you do not have sufficient experience with electrical installations or are unsure about the procedure, it is always safer to entrust the installation to a qualified electrician.
Step-by-step wall luminaire installation guide
After proper preparation and implementation of safety measures, you can proceed with the actual installation of the wall luminaire. Follow the following systematic steps, which will guide you through the entire process from wall preparation to final functional testing of the luminaire.
Wall and electrical installation preparation
First, locate the optimal position for your new luminaire. Consider functional aspects (providing adequate lighting for the intended purpose) and aesthetic factors (harmonious integration into the interior). Use a spirit level to draw a horizontal reference line to ensure straight placement.
Check for hidden electrical wiring, water pipes, or other obstacles at the planned installation site using a detector. This step is especially important if you do not have precise documentation of the wiring in the wall.
If you are installing a luminaire in a new location without an existing electrical outlet, it will be necessary to run new wiring. This work often requires creating a channel in the wall and is best left to a professional electrician. If you are replacing an existing luminaire, check the compatibility of the existing electrical installation with the new luminaire, especially regarding maximum load and connection type.
Wall luminaire mounting
Once the wall and electrical preparations are complete, proceed with the physical mounting of the luminaire. This process may vary depending on the specific model, but the basic principles remain the same. Carefully read the manufacturer's manual, which contains specific instructions for your type of luminaire.
Begin by marking the positions for the mounting holes. Most wall luminaires have a mounting bracket or backplate that needs to be attached to the wall first. Place this bracket in the desired location and use a pencil to mark the drilling positions. Use a spirit level to ensure precise horizontal orientation.
Next, drill holes of the appropriate diameter and depth. For concrete or brick walls, use wall plugs of adequate size. For plasterboard walls, special anchors are necessary to ensure sufficient load-bearing capacity. Screw in the mounting screws or attach the bracket using appropriate fasteners.
When installing heavier luminaires, pay special attention to the load-bearing capacity of the fastening. In some cases, it may be necessary to reinforce the wall or find a load-bearing element (beam, lintel) for secure attachment. An inadequately secured luminaire can damage the wall over time or even pose a safety risk.
Connecting and Testing Electrical Circuits
After successfully mounting the bracket, it's time for the electrical connection. Again, ensure that the appropriate circuit breaker is switched off. Now, connect the electrical wires from the wall to the fixture's leads. The standard color coding for wires is: brown or black for live, blue for neutral, and green-yellow for ground.
Use terminal blocks or other approved connectors for secure wire connections. Never connect bare wires with electrical tape alone. Carefully insulate all connections and ensure that no exposed wire parts remain accessible. After completing the electrical connection, carefully place any excess wires into the wall junction box.
Now, attach the light fixture to the mounting bracket according to the manufacturer's instructions. Most fixtures are secured with two or more screws that pass through the fixture body into the bracket. Ensure all screws are tightened firmly, but avoid excessive force that could damage the fixture's material.
After completing the assembly, switch on the circuit breaker and test the fixture's functionality. If the fixture does not work correctly, switch off the circuit breaker again and check the wiring. Common causes of malfunction include incorrect wire connections or a faulty bulb.
Troubleshooting Common Installation Issues
Even with careful procedures, various complications can arise during wall light installation. Knowing the most common problems and their solutions will help you react quickly and successfully complete the installation without needing to call for professional help.
What to do if the light doesn't work
A non-functional light fixture after installation is a common problem that usually has a simple solution. Proceed systematically to diagnose the cause. First, verify that the circuit breaker is on and that electricity is flowing to the circuit. You can check this by plugging another functional electrical device into the same circuit.
Check the light bulb or light source. It's possible that the bulb was damaged during installation or was faulty when purchased. If possible, try a different bulb. Skip this step for LED fixtures with integrated light sources.
Another common cause of malfunction is incorrect electrical wiring. Turn off the circuit breaker and recheck all connections. Ensure that the wires are connected correctly according to the color coding and that all connections are secure. Sometimes, the switch itself can be the problem – check its functionality and correct wiring.
If the light fixture still doesn't work after ruling out the above causes, the problem might be with the fixture itself. In this case, contact the seller or manufacturer regarding a warranty claim.
How to fix incorrect wiring
Incorrect wiring can lead not only to a non-functional light fixture but also, in worse cases, to a short circuit or fire. Therefore, it is crucial to quickly identify and correct any wiring errors. Always switch off the appropriate circuit breaker before handling any electrical components.
A common mistake is swapping the live and neutral wires. Although the light fixture may still function with this wiring, it creates a safety hazard. Correct wiring should adhere to the standard color coding: brown/black for live, blue for neutral, and green-yellow for grounding.
Another common error is loose connections, which can cause intermittent operation or sparking. Ensure that all terminal blocks are securely tightened and that individual wires cannot be easily pulled out. Also, check that the wire insulation has not been damaged during installation, as this could lead to a short circuit.
For more complex wiring, such as fixtures with multiple light sources or dimming functions, follow the wiring diagram provided by the manufacturer. These types of fixtures often require special switches or controllers that must be compatible and wired correctly.
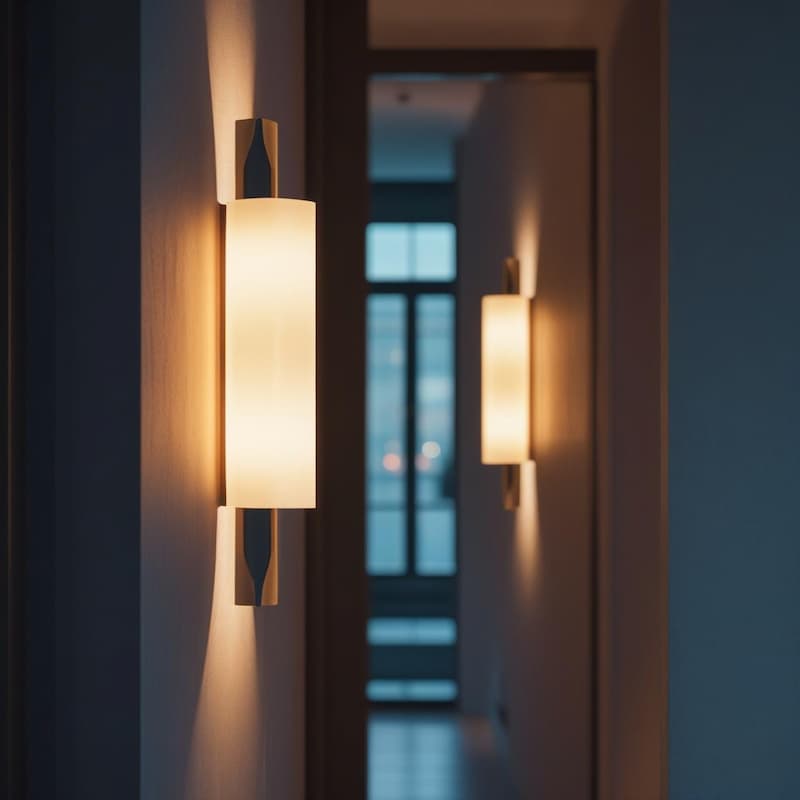
Optimal positioning and maintenance of light fixtures
Proper positioning and regular maintenance of wall lights are key factors influencing both their functionality and lifespan. Careful planning of the installation position and adherence to maintenance principles will ensure that your lights provide optimal lighting conditions long-term and retain their aesthetic appeal.
Tips for proper light fixture placement
The choice of a suitable position for a wall light depends on its primary purpose and the characteristics of the space. For ambient lighting, it is ideal to place lights at a height of approximately 170-190 cm from the floor, which ensures uniform light distribution in the room. For reading or task lighting, the optimal height is lower, typically 100-120 cm above the designated surface.
In living spaces, consider installing wall lights on both sides of significant features such as fireplaces, paintings, or TV walls. This symmetrical arrangement creates a visually pleasing effect and highlights the central element. In hallways and passageways, install lights at regular intervals to ensure continuous illumination without dark spots.
For bathrooms and damp areas, it is essential to respect safety zones. Lights installed in these areas must have an appropriate IP rating. In the immediate vicinity of water (zones 0 and 1), only fixtures with a high degree of protection against moisture (at least IP44, ideally IP65) are permitted.
Also, don't forget practical aspects – lights should not obstruct the opening of doors or windows and should be positioned so as not to cause glare during normal activities in the given space. In bedrooms, position reading lights so that the light is directed at the book, not into the eyes.
Regular maintenance and cleaning
Lighting effectiveness can be significantly reduced by the accumulation of dust and dirt on fixture surfaces. Regular cleaning is therefore essential to maintain optimal light output and aesthetic appearance. Cleaning frequency depends on the environment – in kitchens and areas with higher dust levels, it is advisable to clean fixtures more often, at least once every 2-3 months.
Always turn off the light fixture and allow it to cool before cleaning. For most wall lights, use a soft, dry cloth to remove dust. For more stubborn dirt, the cloth can be slightly moistened with water and a few drops of mild detergent. Avoid aggressive chemicals that could damage the fixture's finish.
Clean glass parts of fixtures with specialized glass cleaners that do not leave streaks. For textile shades, it is advisable to use a soft-bristled brush or a vacuum cleaner with low suction power. For metal components, there are special products that not only clean but also help protect the surface from oxidation.
Part of maintenance also includes regular inspection of electrical components. Check that all screws and mounting elements remain securely tightened and verify the condition of the bulbs – replacing them promptly before complete failure can prevent potential damage to the socket or other parts of the fixture.
Frequently Asked Questions about Wall Light Installation
When planning and carrying out the installation of wall lights, a number of recurring questions arise. Below you will find answers to the most common ones, which will help you better navigate the entire process and avoid common pitfalls.
How long does a typical installation take?
The time required to install a wall light depends on several factors, primarily the complexity of the specific fixture and the condition of the existing electrical wiring. When replacing an existing fixture with a new one, where the electrical wiring is already prepared, an experienced installer can complete the work in 30-45 minutes.
A more demanding situation arises when installing a light fixture in a location without prior electrical wiring. In such a case, time must be allocated for bringing in the electrical wiring, which can significantly extend the total installation time to 2-3 hours or more, depending on the complexity of the intervention into the wall.
For inexperienced DIYers, it is advisable to plan a longer time frame, approximately double the values given, and to have a detailed guide or instructional video available. Some specific types of light fixtures, such as models with complex assembly or non-standard mounting methods, may require additional time regardless of the installer's experience.
Does light fixture installation need to be done professionally?
The question of whether to entrust light fixture installation to a professional or to tackle it yourself depends on several factors, including your experience with electrical installations, the complexity of the project, and applicable local regulations. In the Czech Republic, individuals without electrical qualifications may only perform simple fixture replacements, provided the circuit in question is disconnected from the power supply.
For more experienced DIYers, replacing an existing light fixture with a new one is usually a manageable task. However, it is essential to strictly adhere to safety procedures and ensure that you understand the basic principles of electrical installation. If in doubt, it is always safer to consult a qualified electrician.
Professional installation is strongly recommended in the following cases:
- Installation requires interventions in the main electrical distribution
- New electrical wiring needs to be installed in the wall
- The fixture is to be installed in a humid environment such as a bathroom
- It is a complex lighting system with advanced features
- Local building regulations require professional work certification
Investing in professional installation can ultimately save time, eliminate safety risks, and ensure that the light fixture will function optimally throughout its lifespan.
Conclusion: Successful Wall Light Installation
Installing a wall light is a project that, when executed correctly, can significantly enhance both the functionality and aesthetic value of your interior. The entire process, from choosing the right fixture to the final wiring, requires a systematic approach and adherence to basic safety rules.
Evaluation of the process and results
After completing the wall light installation, it is advisable to conduct a comprehensive evaluation of the entire process and the achieved results. Successful installation is characterized by several key aspects worth noting.
The primary indicator of quality workmanship is the trouble-free operation of the light fixture. The light should be stable, without flickering or other abnormal phenomena. The mechanical attachment of the fixture must be firm and stable, without any play or tendency to move. With slight pressure on the fixture, there should be no deflection or displacement.
From an aesthetic perspective, check that the light fixture is placed at the desired height and position, and that its orientation is perfectly horizontal (or vertical, depending on the design). A well-executed installation should not leave visible traces of mounting, such as damaged wall sections, visible cables, or untidy drill holes.
In addition to immediate assessment, it's advisable to monitor the luminaire's functionality during the first few days after installation. Pay attention to any anomalies, such as excessive heating, unusual sounds, or fluctuations in lighting intensity. These phenomena may indicate hidden installation issues that require additional attention.
If you installed it yourself, remember to keep the luminaire's documentation, including the warranty card and installation manual. If a professional carried out the installation, keep the proof of work performed, which can be important not only for potential warranty claims but also for future electrical system modifications.
A correctly installed wall light should provide optimal illumination for its intended purpose while harmoniously integrating into the overall design of the space. If you are satisfied with both the functional and aesthetic results, you can consider your installation a success.
To maximize the lifespan of your new luminaire, follow the manufacturer's maintenance recommendations and use the appropriate bulb type and wattage. Regular cleaning and checking electrical connections will ensure that your luminaire continues to function effectively and remains a safe element of your home for a long time.
In conclusion, installing wall lights does not have to be a complex task if you proceed methodically and with respect for safety principles. Whether you opt for professional installation or undertake the project yourself, a well-installed wall light is an investment that will pay off in the form of a comfortable and aesthetically pleasing environment.
0 comments